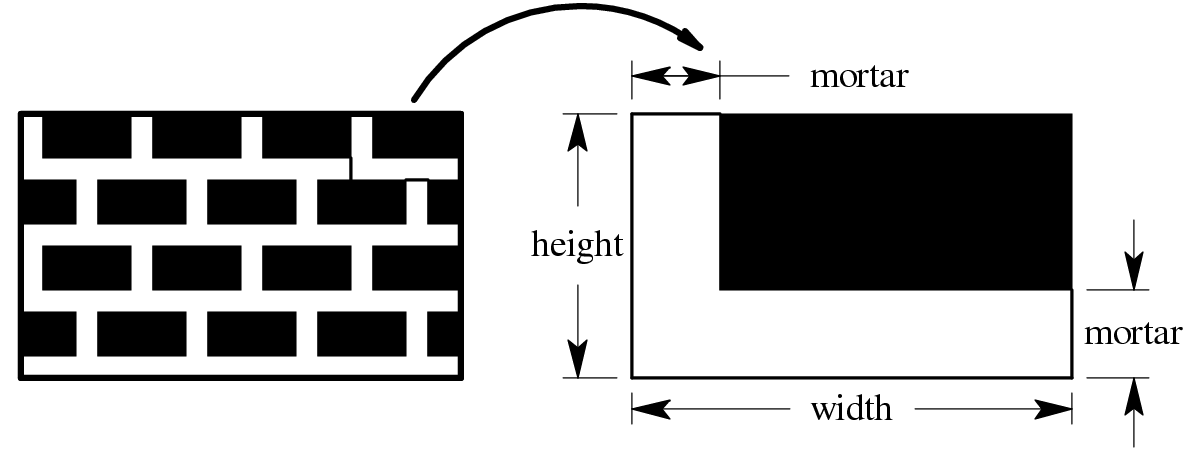
Figure 1.1. Size and shape parameters for brick shader
Procedural shading is a proven rendering technique in which a short user-written procedure, called a shader, determines the shading and color variations across each surface. This gives great flexibility and control over the surface appearance.
The widest use of procedural shading is for production animation, where has been effectively used for years in commercials and feature films. These animations are rendered in software, taking from seconds to hours per frame. The resulting frames are typically replayed at 24-30 frames per second.
One important factor in procedural shading is the use of a shading language. A shading language is a high-level special-purpose language for writing shaders. The shading language provides a simple interface for the user to write new shaders. Pixar's RenderMan shading language [Upstill90] is the most popular, and several off-line renderers use it. A shader written in the RenderMan shading language can be used with any of these renderers.
Meanwhile, polygon-per-second performance has been the major focus for most interactive graphics hardware development. Only in the last few years has attention been given to surface shading quality for interactive graphics. Recently, great progress has been made on two fronts toward achieving real-time procedural shading. This course will cover progress on both. First, graphics hardware is capable of performing more of the computations necessary for shading. Second, new languages and machine abstractions have been developed that are better adapted for real-time use.
Interactive graphics machines are complex systems with relatively limited lifetimes. Just as the RenderMan shading language insulates the shading writer from the implementation details of the off-line renderer, a real-time shading system presents a simplified view of the interactive graphics hardware. This is done in two ways. First, we create an abstract model of the hardware. This abstract model gives the user a consistent high-level view of the graphics process that can be mapped onto the machine. Second, a special-purpose language allows a high-level description of each procedure. Given current hardware limitations, languages for real-time shading differ quite a bit from the one presented by RenderMan. Through these two, we can achieve device-independence, so procedures written for one graphics machine have the potential to work on other machines or other generations of the same machine.
We will show a shader that might be used for a brick wall (Figure 1.1). The wall is to be described as a single polygon with texture coordinates. These texture coordinates are not going to be used for image texturing: they are just a pair of numbers that parameterize the position on the surface.
The shader requires several additional parameters to describe the
size, shape and color of the brick. These are the width and height of
the brick, the width of the mortar between bricks, and the colors for
the mortar and brick (see Figure 1.1). These parameters are used to
fold the texture coordinates into brick coordinates for each
brick. These are (0,0) at one corner of each brick, and can be used to
easily tell whether to use brick or mortar color. A portion of the
brick shader is shown in Figure 1.2 (this shader happens to be written
in the pfman language, detailed in Chapter 3). In this figure,
ss and tt are local variables used to
construct the brick coordinates. The simple bricks that result are
shown in Figure 1.3a.

// find row of bricks for this pixel (row is 8-bit integer)
fixed<8,0> row = tt/height;

// offset even rows by half a row
if (row % 2 == 0) ss += width/2;

// wrap texture coordinates to get "brick coordinates"
ss = ss % width;
tt = tt % height;

// pick a color for this pixel, brick or mortar
float surface_color[3] = brick_color;
if (ss < mortar  ||  tt < mortar)
    surface_color = mortar_color;
Figure 1.2. Portion of code for a simple brick
shader


| Chapter 1 | (Marc Olano): | This introduction. |
| Chapter 2 | (Ken Perlin): | Background on the beginnings of procedural shading and how (even then) it was influenced by hardware concerns. |
| Chapter 3 | (Marc Olano): | The shading capabilities of PixelFlow, the first real-time shading system. |
| Chapter 4 | (Wolfgang Heidrich): | Some issues that make evaluating shading expressions into a texture, one of the most common techniques for real-time shading, harder than it looks. |
| Chapter 5 | (Wolfgang Heidrich): | Hardware shading effects, the building blocks for later procedural shading systems. |
| Chapter 6 | (Marc Olano): | Multiple rendering passes using the building blocks from Chapter 5 can be put together to create a full-fledged real-time shading system |
| Chapter 7 | (Erik Lindholm): | Vertex and texture shaders, some of the latest developments in making graphics hardware more flexible and programmable. |
| Chapter 8 | (Bill Mark): | A shading language compiler that gives the same high-level interface for both multi-pass shading as introduced in Chapter 6 and shading hardware extensions as introduced in Chapter 7. |
| Chapter 9 | (Ken Perlin): | Noise, one of the basic building blocks for procedural shading, and how it might be implemented efficiently. |
| Chapter 10 | (John Hart): | Several methods for producing solid textures on hardware. |
| Chapter 11 | (Marc Olano): | How multi-pass rendering techniques could be expanded to support a full-featured shading language like RenderMan. |
| Chapter 12 | (Michael McCool): | A new graphics API built around a conceptual model of graphics hardware more appropriate for procedural shading. |
| Chapter 13 | (Evan Hart): | Though not course presenters, Evan Hart and Jason Mitchell have kindly provided details on ATI's new hardware shading extensions. |
| Chapter 14 | (John Hart): | A formal notation for analysis of different real-time shading techniques. |
| Chapter 15 | (All): | A collected bibliography of some of our favorite papers. |